For exceptional accuracy, finish & performance, choose Carbon Fiber
Proto-pasta Carbon Fiber Composite HTPLA is a combination of milled carbon fibers and high-performance PLA. Resulting 3D printed prototypes and end-use parts are characterized by exceptionally stability of form and potential use up to 155 deg C (310 deg F) when heat treated.
Adaptable to most PLA-compatible printers. Heated bed recommended for process ease, quality, and reliability, but not required. Printer should allow 3rd party filament, parameter adjustment, and nozzle replacement. Specialized machine adaptation and maintenance may be required for Proto-pasta materials particularly in continued use of abrasive materials. More on getting started. More about our release of Carbon Fiber HTPLA.
Tech Specs
- Base material: Heat treatable PLA w/ high temp resistance
- Characteristics: low odor, non-toxic, renewably-sourced
- Molecular structure: Amorphous or partially crystalline
- Amorphous as printed, part crystalline when heat treated
- Melting resets crystalline structure to amorphous state
- Additives: 10% by weight high-purity, milled carbon fiber
- Max particle size: 0.15 mm (may limit resolution)
- Density: approx. 1.3 g/cc
- Length: approx. 360 m/kg (1.75 mm) & 136 m/kg (2.85 mm)
- Min bend diameter: 40 mm (1.75 mm) & 100 mm (2.85 mm)
- Glass transition (Tg) onset: approx. 60 deg C (140 deg F)
- Melt point (Tm) onset: approx. 155 deg C (310 deg F)
- Max use: Tg for amorphous, Tm for crystalline
- Use limit is geometry, load & condition dependent
Safe Handling
- Material Safety Data Sheets (MSDS)
- Hold filament end when unwrapping spool to avoid looping
- Protect eyes when handling filament, particularly 2.85 mm
- Coiled filament stores energy & may try to unwind
- Do not bend tighter than min bend diameter (in tech specs)
- Over-bending filament can cause breakage & projectile
- When done printing, secure filament end to avoid looping
- Store in cool, dry place away from UV light for peak performance
Prop 65 Warning! May cause cancer or reproductive harm.
However, in an effort put this statement in perspective, consider our blog on this subject to better-understand actual risks.
RoHS compliant - does not contain Cadmium (Cd), Lead (Pb), Mercury (Hg), Hexavalent Chromium: (Cr VI), Polybrominated Biphenyls (PBB), Polybrominated Diphenyl Ethers (PBDE), Bis(2-Ethylhexyl) phthalate (DEHP), Benzyl butyl phthalate (BBP), Dibutyl phthalate (DBP), or Diisobutyl phthalate (DIBP)
Regarding food contact - though base resin may be safe for food contact, our process & additional ingredients may not be. Thus our materials are not certified for food contact even if the risk is low. Please consider additional coatings, treatments & testing before pursuing extended food contact or certification.
Regarding skin contact - Not a known skin irritant, however, avoid recommending prolonged skin exposure without further testing.
Packaging
- Available in 1.75 & 2.85 (3.00) mm diameters
- 50 g loose coil, 500 g on cardboard spool & 3 kg on plastic spool
- Cardboard spool weight: up to 100 g
- Cardboard spool dims: 20 cm dia x 6 cm wide w/ 5 cm opening
- Carefully remove cardboard spool sides for Masterspool use
- Loose coils also Masterspool compatible (instructions for use)
- More details about Masterspool including download
- Recycle cardboard spools locally
- 3 kg spools weight: up to 1 kg weight
- 3 kg spool dims: 30 cm dia x 10 cm wide w/ 5 cm opening
- Return plastic spools for re-use
Printer
Some machines may require specific considerations for filament placement, path, adjustments, settings, or other preparation & maintenance.
- Spool should unwind with minimal resistance
- Mount filament above machine or other unobstructed position
- Filament path must not bend tighter than min bend diameter
- Filament should remain clean, dry & dust-free
- Check weight before printing to avoid material run out
- Be careful not to place printer too cool or warm environment
- Clean print surface with alcohol or water
- Apply & reapply appropriate adhesion aid as required
- Carefully control first layer gap for adhesion without jamming
- Limit build rate to balance melting, cooling & movement limits
- Adjust layer fan to balance part & nozzle cooling
- Isolate/insulate heater block from layer fan for consistent heating
- Maintain & replace nozzle & other components when worn
Abrasive materials like Carbon Fiber and Metal Composites may cause premature wear of in line components such as bowden tubes, drive gears, nozzles, and other items in the filament travel path. Serviceable hardware including replaceable nozzles suggested. Wear resistant nozzles are recommended for extended use. Nozzles wear most quickly with flattening of the tip which affects nozzle diameter & distance to build plate. Inconsistent extrusion, inaccuracy & process instability. Extrusion width & first layer distance adjustments and/or replacement of nozzle. For more on nozzle replacement consider this blog demonstrating nozzle replacement & adjustments on a Prusa MK3. Reduce nozzle wear by minimizing over-extrusion & infill.
Printing
Product label suggest temperatures as a guideline based on typical nozzle set points. Appropriate settings can vary widely & in given good conditions, a wide range of temperatures can yield positive results. With relatively low print rates on hardware without hangups, HTPLA prints well at the low side of the recommended range. With high print rates on machines with hardware hangups, higher than labeled temperatures may be required for consistent extrusion. In some cases, oiling filament makes the difference between success & failure.

One specific problematic example is the Prusa MK3 which, by design, has a Prusa-specific heat break with an internal ledge that material can get caught on. To reduce need for nuance & risk of jamming, users should either replace the Prusa-specific heat break with a standard e3d v6 one, oil filament to help it slip past the Prusa-specific ledge, or print at an unusually high temperature. The trade off with high temperature as a solution is you should also match that with a high volume flow rate. Sounds great, right? It's okay except for the loss of detail when having to slow down for small part, fine feature, or high resolution printing.
Prusa MK3-specific, Carbon Fiber HTPLA process recommendations:
- 1st layer temp to overcome jamming on Prusa MK3: 255 deg C
- Min temp to avoid jamming @ 9 cubic mm/s: approx. 240 deg C
- Max recommended volume flow @ 240 deg C: 9 cubic mm/s
- Min recommended volume flow @ 240 deg C: 1.5 cubic mm/s
Volume flow = extrusion width x layer height x speed in mm.
For example, 0.5 mm extrusion width & 0.2 mm layer height for speed 20-90 mm/s.
Poorly cooled cold sides of all metal hotends can yield a similar result & benefit from similar fixes to the Prusa MK3. Aggressive layer fans not isolated from heat blocks and/or nozzles can make for a jammy combination as well. Finding the balance between enough cooling fan when printing fast & a high enough nozzle set-point can be challenging. More isolated hotends with PTFE liners can allow slower printing with lower set points for more detail with less aggressive layer fan settings. Also, insulating your heater block and/or nozzle with a sock can help avoid unwanted layer fan cooling. Rapid changes in speed or print rate should also be avoided whenever possible.
For more on the subject of printing, consider our getting started guide.
Heat Treating
HTPLA is a semi-crystalline grade of PLA optimized for heat treating (also known as annealing or crystallizing) for higher temperature use. Without heat treating, "as printed" amorphous PLA loses significant stiffness (and the thus the ability to retain form) as the material approaches it's relatively low glass transition temperature. Heat treating creates a more crystalline molecular structure for maintaining stiffness to near melting, thus extending the useful range of HTPLA, but crystallization also creates shrinkage. HTPLA parts should be scaled in slicer to compensate for shrinkage when heat treating.
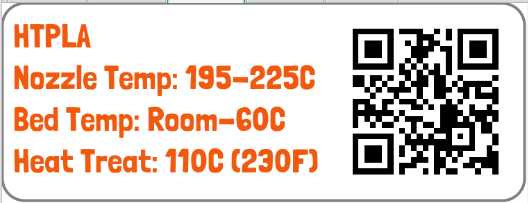
- Typical heat treat temp: 95-110 deg C (200-230 deg F)
- Typical heat treat time: 10+ minutes
A large range of temperatures & times can yield acceptable results. With translucent grades and thin wall parts like a single wall vase, you can see a visual change from transparent to opaque begin in as little as 3 minutes with a full transition to opaque in 7 minutes. Parts with more mass will take more time. What's important is the core temp and time to ensure a comprehensive change in material structure to crystalline throughout the part.
- Typical change in heat treating: -0.6% x/y, +1% z
- Slicer scale in heat treating:1.006 or 100.6% x/y, 0.99 or 99% z
Here's a demonstration of measuring shrinkage, determining change, and applying compensation in printing. Here's additional demonstration of application of scale, heat treating, and validation of form.
Additional post processes might include sanding or painting. The addition of Carbon Fiber can lend well to ease of sanding and adhesion of coatings like paint, however, there are also additional safety considerations when generating dust through sanding and fumes through coating. Please seek safe practices with appropriate personal protective equipment (PPE) and ventilation.
Examples & Uses
Applications:
Prusa Extruder Assembly Housing
Hardinger Fiddle Musical Instrument
Filament Testing Grips


